Nate says. . .

My sweet friend Brittany- super mom to three boys three and under, is always posting these hilarious entries about things her oldest says. Now that Nate is talking constantly, I definitely want to take up that tradition as well so I can look back and remember how much this little fellow makes me laugh.

Image

Nate, Pre-haircut

Things Nate has said lately:

  • We were at Coosh’s tonight and there were a couple of little girls Nate’s age standing next to our table. I told him to say hello to the pretty girls. “Hello, pretty girls!” After they left, he exclaimed, “I want to see more pretty girls!”
  • Twice in a row we have gone to get him out of bed in the morning only to find him completely naked and saying “I want to put jacket on. Meese.”
  • “Meese” is how Nate says please.
  • He has a few toy air planes. The other day he licked one and said “delicious!”
  • While playing/watching basketball: “Intense!”
  • We gave him a few Cadbury robin’s eggs last night after dinner, telling Nate that he could have a sweet treat since he ate so much. After very quickly polishing off the world’s most awesome Easter candy: “I want more sweet treats!” Me too little buddy, me too.
  • Nate has connected the fact that Christian is his baby brother. I asked him the other day to kiss baby brother, and after he kissed my belly he said “I kissed Christian!”
  • He refers to anything he can’t pick up as “the big.” He says it with a strained voice as if he is trying to lift something huge which makes it pretty funny. Usually he is trying to lift a tree in our yard or something ridiculous. The other day he asked me to get a ball out from under the entertainment center and I said, “I can’t, Mama’s the big!” Now he announces “Mama’s the big!”
  • Trey was putting his pajamas on the other night and struggling with a foot. “Daddy can’t do it” was his assessment. Trey is a pro at pretty much all things dad so he laughed that one off.
  • Trey has taught him man words. I am not a particular fan of the fact that my son can proudly tell us all when he has, um, you know. I have to admit it’s funny since he says “I tarted!” with a big grin. He also makes sure to remind us when he takes a bath of “Nate’s penis!” and lately he has taken to asking about everyone else’s penis. . . not sure how to handle that one yet but so far we just say “ok” change the subject, and hope he doesn’t talk too much about that in the church nursery.
  • He loves to pray. Randomly he will stop what he is doing, close his eyes and say “I pray Daddy, I pray Grace Grace, I pray Gee, I pray Bee, I pray Dede, I pray Bubbie, I pray Dewie, I pray Bear Bear, I pray Miller.” Sometimes he focuses in on one person and repeats it for a good five minutes. It melts my heart.

Nate definitely keeps us laughing. That’s all for now.

Leave a comment

Filed under Nate Update

Baby Brother’s Nursery

Nate runs as fast as he can to the end of the house to baby bro’s room when we ask about “baby brother’s nursery.” He is also really good at talking about “Christian’s Room.” He is loving the changes to his former playroom. Thank goodness! We scaled back the budget for this nursery project since we went a little crazy with Nate’s room, but it resulted in way more creativity and handmade touches. I love it.

The Chinese lanterns came from some Pinterest inspiration. The “crib” is our play yard with a slipcover on it. It’s made with seersucker and polka dots, two of my favorite things. Hopefully Nate will give up his crib soon, but we are happy to have him sleep for 12 hours a night and are no longer in a rush to get the crib in the nursery. The precious cross was a present from Aunt Carrie Anne.

Okay, I didn’t actually make this cool guy. He was a present. He’s from here.

The wall color is Benjamin Moore Cumulus Cotton. (Had to write it down so I don’t forget when we need touch up paint!)

Trey’s sweet parents rounded up the rocker for us, and the little stool was my grandmothers. Some spray paint, fabric, and upholstery work transformed the somewhat sad little pieces into a perfect seating area for our buddy’s nursery. I made the pillow slipcover and had it monogrammed.

The tag decoration says “Let your light shine.” It was a Christmas present from the husby and I adore it. The lamp is a family heirloom of sorts. My mother gave it to my cousin Julie when she had her first, and now that her youngest has outgrown it, it will live in my children’s nurseries until her children need it for their children.

Noahs ark.

Before Nate was born, we put a little teddy bear in his room so he would have something from us when brought him home. For Christian it’s the blue elephant. The best part- it can be monogrammed! We will put his birthday on it as soon as we have the date.

The prints are from this adorable Etsy shop. I made the changing pad cover using a great tutorial from Prudent Baby.

This super cool vintage mobile hangs above the rocking chair. It is made of tin and came from Monticello (think Thomas Jefferson, not Florida.) Thanks Bill and Kiki!

All there is to do now is sit back and wait!

Leave a comment

Filed under Uncategorized

Mobile Blogging

Just testing…

20120304-141135.jpg
Isn’t he cute?

Leave a comment

Filed under Uncategorized

The Wingback Chair

I cannot explain this season of nesting. Normal nesting includes organizing, obsessive cleaning, readying the nursery but for me it has meant one thing: PROJECTS. As in, teach-yourself-to-upholster-things projects. I have no explanation as to why, but as it turns out, it can be done.  Since a few of my facebook buddies have asked how I managed such insanity I figured I would put it here, then post to facebook.  I do not recommend attempting this if you have a) never used a sewing machine, b) care what your nails look like, or c) are not a patient person. That said, here goes:

Materials Needed:

  • 6.5-7 Yards of Home Decor Fabric (I got mine from Chrysalis on clearance and they were amazingly helpful, my favorite place to go for fabric by far. Also, I recommend a forgiving print.  If I had used a geometric print or stripe on this chair the imperfections would be a lot more noticeable!)
  • Rubber Mallet
  • Flathead Screwdriver
  • Air compressor with staple gun (You MUST have this, I borrowed mine and would not have been able to finish the project without it, nothing else will staple into a wood frame.)
  • Needle nose pliers
  • Sewing machine
  • Snug fitting gloves
  • Sharpie for writing on the pieces of fabric removed, they become your pattern.
  • Iron
  • Masking Tape
  • Metal Teeth ( I could not find them at any craft stores, only online and they were pretty expensive. The Furniture Wizard, a local upholstery shop, sold some at cost to me even though that is not normally something they sell.  They thought I was nuts but took pity on the pregnant lady with toddler in tow.)
  • Small (clean) rubber hammer
  • Tack strip- can be purchased at Tallahassee Decorative Fabrics but I was able to reuse the original.
  • A helper (Trey was mine and I couldn’t have finished it without him, you really have to have two people to adjust the fabric correctly.)

Here’s What I Did:

Image

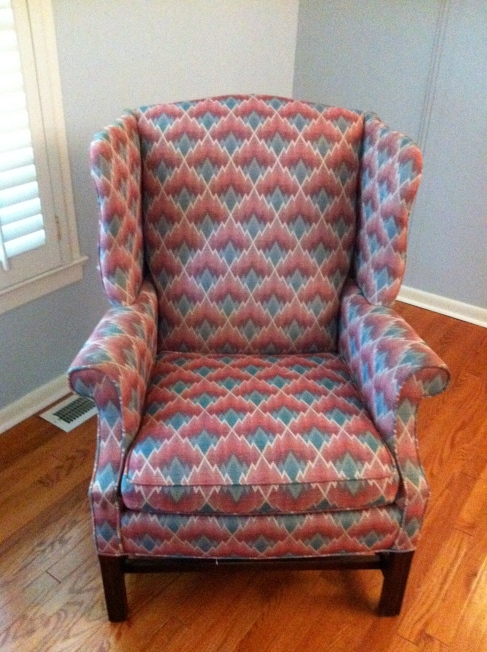
This was the chair to begin with. It was in my mom’s office and she didn’t need it anymore so it came to us. It was in great condition and a beautiful shape so I figured I could do something with it. I googled “reupholstering wingback chair.” Here are the links to videos/sites that I found helpful:

Most of these sites also include more helpful links, but it’s a good place to start.

The first thing to do is remove all fabric from the chair. This means turning it upside down and removing the bottom piece.

Image

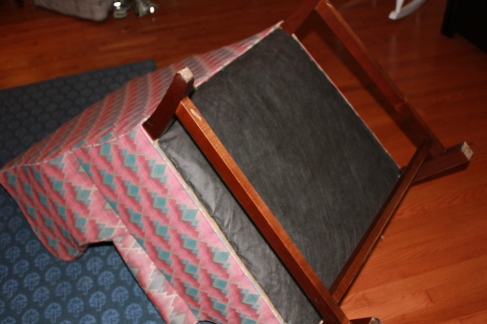
Put on your gloves, take the screwdriver and the rubber mallet and pry up each staple. You may also have to use the pliers to pull out stubborn staples. It helps to twist them.  Removing the staples was by far the most difficult part of this project.

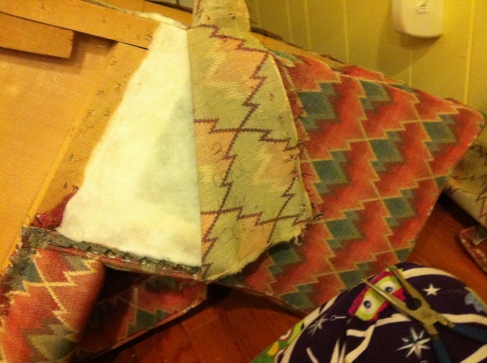
Once the bottom is removed, you can look to see the layers of fabric and which on to remove first. For my chair it was the lower bottom front. You want to remove the last piece of fabric to be attached and continue to carefully remove each piece like the layers of an onion. You don’t need to save the piping but you might be able to remove the cording to reuse for the new piping. I just pulled it out and taped it with masking tape noting where it goes. (“bottom”, “right/left wing”, “Back” etc). Make sure to take photos, and write down which way is up, what it is, and the order number in which you removed it. This will make putting it back together much easier.

Image

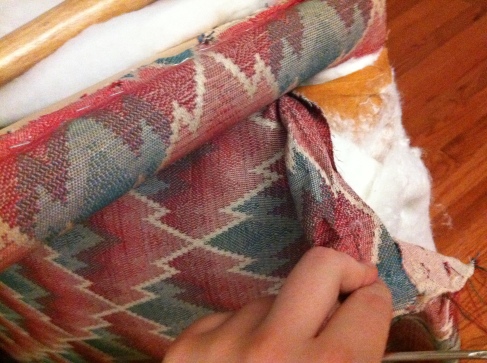
You can see the old metal teeth in this photo- they were totally destroyed when removed.

Image

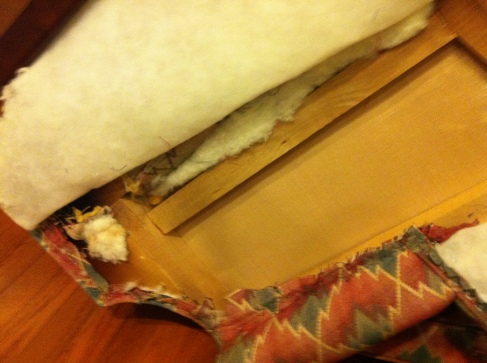
I pulled back the batting to remove all of the fabric instead of removing it completely. The only piece of batting that had to be totally removed was the back.Image

Image

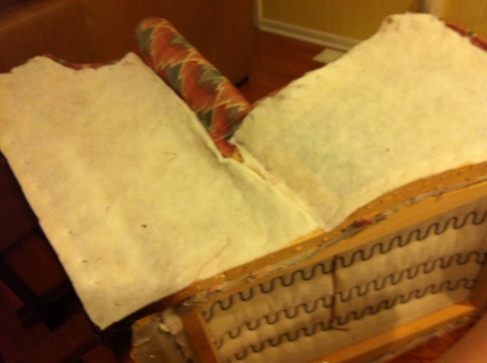
(Photo of the way the fabric was folded to reference when putting on the new fabric.)

Image

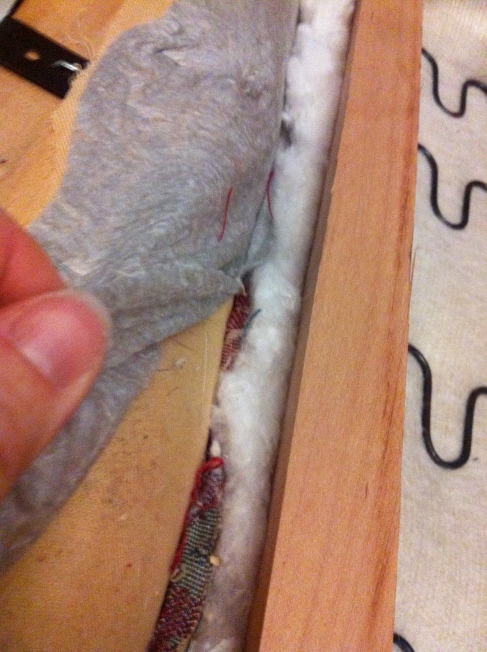
How the fabric attached through the wood frame. I ended up cutting the piece larger on the sides so that I could pull it through completely and staple to the frame on the outside rather than at an angle like the original.

Once all of the fabric is removed, iron out all of your pieces. Lay those pieces on the new fabric and trace them. Make sure the pattern is going in the same direction up the chair. Write on the masking tape their number, which was is up, and what they are (example: “right outside wing, 8, ^”). Tape the piece then cut it out, but keep the old pieces for reference. Then make the piping, the arms, and the cushion. I do not have photos of those steps but I just paid attention to the way they were assembled and used the originals as the pattern.  For the arms I pinned them together inside out on the reverse arm and sewed them together very slowly and almost on the piping. If you don’t get close enough the piping will be loose and look wrong. Maybe add a seam ripper to the list- I used that a lot!

What is described above took me about 20 days of working on it for about 2 hours a night. I am hoping it took longer because I was 35 weeks prego and was tired and just bending over felt like work. Maybe you will be able to do it much faster. I hope so!

Now it’s time to move the chair outside to staple on the fabric. Husby hooked up the stapler for me and we began stretching a stapling the fabric little by little in the order I took them off. Don’t forget about the piping either! I wish I had a photo of putting the metal teeth on but basically you just staple the non-tooth half right up to the piping in places where the metal teeth was originally. Carefully hook the fabric on to the metal teeth and only close it when it is all attached. Use the small rubber hammer for this. For my chair that included the outside of the wings, under the arms, and on the back. For the outer bottom half (right under the arm to the back of the chair) we staple the fabric at the top first, then stapled on the tack strip, then folded it down and attached the metal teeth and the back. The tack strip is just to ensure you have a neat fold, but it was very easy to install. Make sure to pull the fabric extremely tight. Hopefully the end result will be something like this:

Image

Image

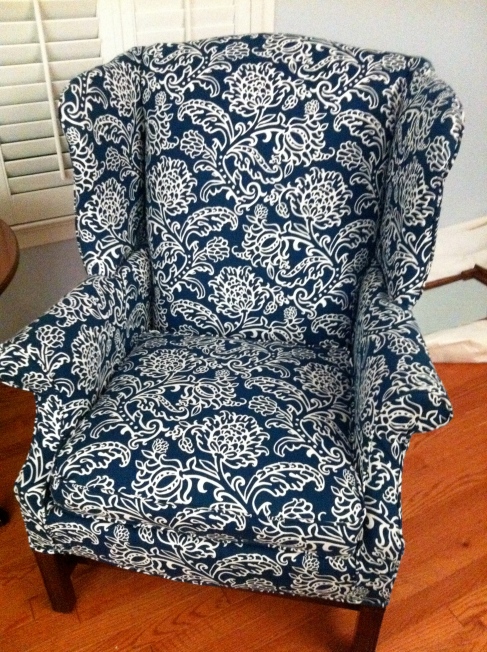
So there it is. Everything I know about reupholstering a wingback chair. Good luck! You can do it if you’re stubborn enough!

Leave a comment

Filed under Crafts

Aaaaaand we’re back

I don’t know what it is about the fall months, but I just can’t seem to get it together blogging wise. Sorry for the long hiatus, but I just wanted to let you know we’re back.  Many updates to come- until then, here are a couple of pics of my favorite little guy in the world.

Christmas 2010


Playing with his birthday present from Mama and Daddy!


1 Comment

Filed under Uncategorized

An important discovery!

Important is a subjective term, but if you enjoy chocolate milk, this is crucial information I’m about to share with you.  I occasionally go to New Leaf for our groceries, they have the BEST food but it’s pricey and further away than Publix so it isn’t in our weekly routine. Two days ago, something caught my eye.  Chocolate Milk. In a glass bottle. As in, milkman-drops-off-milk-then-you-return-bottles-for-new-milk bottle. I went in for closer inspection and sure enough the price tag had a little note that said “return clean bottle for deposit.”  Not being able to resist the opportunity to flashback to a more charming era (in some respects at least) and the delicious looking chocolate milk, I purchased a gallon.  I cannot even put into words how amazingly delicious this chocolate milk was.  It was like melted chocolate ice cream mixed with little bits of heaven (i.e. butterfat I’m guessing) Anyways, I’m not ashamed to say it was gone by midday today.  So I diligently cleaned the bottle and Nate and I headed back to New Leaf to see if they were going to make good on the bottle deposit.  They did! And now we have an (almost) full new gallon in the fridge. Bliss.

They don’t have a website, but the Ocheese Creamery is located in Blountstown, FL! The milk doesn’t have to travel far, which must add to the deliciousness.

They also carry this brand at TomatoLand but it’s hit or miss because their products seem to rotate out a lot, but if New Leaf is too far it’s worth a shot! Enjoy!

3 Comments

Filed under Uncategorized

quick update

Nate is doing MUCH better with his naps!  My only hope would be to get them to go a little longer, but he now goes down without a fuss and sleeps anywhere from one hour to two, two to three times a day.  Sometimes I think he just wakes up too early and that throws off his nap schedule, thus creating three naps. I am just thankful he no longer has to cry to fall asleep! It is so wonderful to do laundry, fix lunch and recharge a bit while the buddy gets some sleep.  Thanks to everyone who gave me helpful advice- I think I’m starting to get the hang of this whole sleep thing! Which means I’m due for a new challenge. . .

5 Comments

Filed under Uncategorized

The Babies: Nate Edition

I learned how to use iMovie!

5 Comments

Filed under Uncategorized

Nate Dancing!

1 Comment

Filed under Uncategorized

A Better Day!

Ahhhhh, this morning.  I got to wake up an hour later than usual, went for a run, and returned to a fresh cup of coffee, my sweet little boy, and my husby who took the liberty of getting up early with Nate and running a few errands. I put Nate down about an hour ago.  He fussed a little, didn’t sit up, and was asleep within 15 minutes.  I think today should be great.  GO NOLES!!!!

Leave a comment

Filed under Uncategorized